6.03 Build and test
Now it’s time to make your project. Start small, and add more to your project if you have time.

Tip: Remember to test your project each time you add something. It is much easier to find and fix bugs before you make more changes.
You will need to decide in what order to build your project. You could:
- Create one variable and allow the user to control it. Add animations, costumes, sound, effects, and conversation to make the sprite really come to life
- Create multiple variables with simple ways for the user to control them, and then add more effects later
Adding a sprite and then creating a variable is a great start.
You have built up some really useful skills. Here is a reminder to help you make your project:
Using variables

Click on Variables in the Code tab, then click on Make a Variable.

Type in the name of your variable. You can choose whether you would like your variable to be available to all sprites, or to only this sprite. Press OK.

The variable will show on the Stage:

If you want to hide the variable on the Stage, uncheck the box next to the variable in the variable
Setting a start value
If your variable should have the same starting value every time your project is run, then add a script to set it:

Add a sprite to act as a button.
Tip: any sprite could be a button but there are already some button sprites in Scratch that you can use.
Click on the Variable
Give the variable

You will need to add code to your button sprite to update the variable
- Use the button to
setthevariable

- Use the button to
changethe existing value in avariable

- Use the button to
aska question andsetvariableanswer.

Loops can be used to repeatrepeat until a condition is met, or run forever.
Inserting a change block into a loop will changevariable each tim the loop runs.
The code below would accelerate a sprite gradually:

The code below would increase a player’s score the longer they played the game:

The code below would keep running the loop adding 1 to the time variable until time= 50.

You can also use built in Scratch variables, such as size, costume number, volume and direction:
Checking conditions

In Scratch it’s often useful to run code blocks every time a condition becomes true.
You can do this by placing an if block inside a forever block. You will need to trigger the script, for example with a when flag clicked or when I receieve block.
You can check for important conditions in a game:

Or check use an operator with a variable value.

There are a number of hexagon shaped operator blocks that can be used to check conditions in if, if...else, wait until, and repeat until blocks to make a decision.
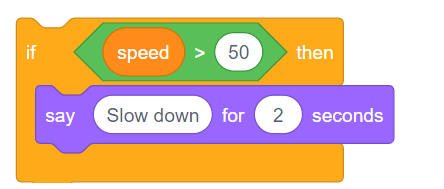
The >, <, or = operators check the relationship between two values or variables:
- Greater than:
- Less than:

- Equal to:

The and, or, and not operators make logical decisions if:
and

or– either condition is true:

not– the condition is false:

The blocks inside an if...then block will only run if the condition in the hexagonal input is true.

There are lots of hexagonal shaped condition blocks in Scratch, including blocks in the Sensing and Operators blocks menus.

If you want to run different blocks when the condition is false then use an if...then...else block instead:

You can build more complex checks by ‘nesting’ if...then and if...then...else blocks one inside the other.
Some blocks in Scratch allow you to choose a colour.

You can choose a colour to match a colour that appears on the Stage.
Click on the colour input to open the colour picker and then click on the eyedropper at the bottom.

Move the mouse pointer over to the Stage and move around until you have selected the colour you want and then click (or tap) to select the colour.

The colour in the block input will change to match the colour you chose. Click in the Code area to close the colour picker.
Broadcasting and receiving messages

A broadcast is a way of sending a message which can be heard by all sprites. Think of it like an announcement made over a loudspeaker.
Broadcasting spells: Use the magic wand to click on the buttons and cast spells. What does each spell do to the characters? See inside
You can create a message to be broadcast. The message text can be anything you like, but it is useful to give it a sensible description.
- Find the
broadcastEvents - Select New Message in the drop-down menu.

- Then type your message

Send a broadcast
You can decide when to broadcast your message. For example:

Receive a broadcast
Sprite can react to a broadcast by using a when I receive block. Multiple sprites can respond when they receive the same message.
You can add blocks below a when I receive block to tell the sprite(s) what to do when they receives the message.

Working with text:

You can use the emoji keyboard to add use emojis anywhere you can type text in Scratch.
Instead of typing text use the emoji keyboard shortcut for your Operating System:
- Windows – Windows key + ‘.’
- MacOS – ctrl + cmd + space
- Linux – ctrl + ‘.’
You can use emojis in the value of a variables:


Or, in the Text tool in the Paint editor.
Tip: Emojis can look different on different computers so they might not look the same on a tablet and a desktop computer. Some emojis aren’t available on some computers, but most modern computers will support them.
You can use the ask and answer blocks from the Sensing blocks menu to have a conversation.

Add blocks to a script on the sprite that will ask a question:

Debug: Check that you have spelled the options correctly in your code and in your answer. It’s okay if you use capital letters, so “Yes” and “YES” will match “yes”.
Add multiple questions to create a chatbot or non-player character that you can talk to.
Tip: If you hide the sprite that asks a question, then question will appear inside the input box instead of as a speech bubble.

You can use the join block from the Operators block to join text and variables to make longer strings.
Drag a join block into the block where you want to use it:

Replace the text with the text you want to use, or drag in a variable:

Tip: The join block doesn’t add spaces so you will need to type them.
You can drag a joinjoin to create longer text strings:

Notice the ‘space’ at the end of Hi, I'm and the beginning of the cat.
Backdrops, movement, and graphic effects

The glide blocks in Scratch can be used to move a sprite across the Stage.
A sprite can glide to a specific point (coordinates), a random postion, the mouse pointer, or to another sprite.
Positon your sprites in their starting points then select the sprite that is going to glide:

Drag a glide (1) secs to x: y: block into the Code area but don’t attach it to any other blocks yet. This block has the coordinates of the starting point and will be used later to make the sprite return:

Drag a glide (1) secs to (random position v) block into the Code area and add it to your code at the point you want the sprite to move.
Click on the dropdown menu and select the name of the sprite you want to glide


Finally, drag the glide (1) secs to x: y:glide

You can use backdrops in a Scratch project to create different pages or levels.
Changing backdrop tutorial: See inside
Click on the Stage pane and then the Backdrops tab to view the backdrops for your project. You can drag the backdrops to reorder them.

There are lots of ways to move to the next backdrop. Choose one that works for your project.

Abby thinks “Hmm”: See inside
You can use switch costume to blocks before and after a say for, think for, play sound, or wait block to make your character show their feelings

Tip: Make sure that you use a block that has a time value, not a start sound, say, or think block, otherwise, you will not see the costume change.
You can use switch costume to and move blocks in a repeat loop to animate a moving character. Change the time in the wait block to change the speed.

Tip: If you want to use all the costumes that a sprite has, you can just use the next costume block in a loop.
Tip: Increase the number of steps in each move block to make the sprite go faster. Change the number in the repeat
Tip: To make the sprite move backwards, you can use negative numbers, for example, move-3 steps. Or, you can use a point in direction -90 block to change the sprite’s direction before the sprite moves (-90 points to the left).
Rooster effects: See inside
The set color effect to and change color effect by blocks both have drop-down menus in which you can choose from a range of different graphic effects that can be used to change your sprite’s appearance:
color0to199(bigger numbers will wrap around, so2000fisheye:0whirl:0pixelate:0mosaic:0brightness:0100make the sprite lighter, and negative numbers down to-100ghost:0100
Try to set

Tip: A color effect of 225 is the same as a color effect of 25

Use the clear graphic effects block to start again. Clicking on the green flag also clears all graphic effects.
To set a graphic effect for a sprite when the project is started, place a set graphic effect to block under a when green flag clicked block:

Tip: You can also set and change graphic effects for the Stage.
When you are creating a book, animation, presentation, or game with levels, some sprites should only show on some backdrops.
Show and hide sprites on different backdrops: See inside
Click on the Stage or press the Space key to switch to the next backdrop.
Use show and hide blocks with the when backdrop switches to block to make sprites only show on the backdrops where they belong.
The Beachball sprite:

Set the backdrop when green flag clicked to make sure that sprites show or hide correctly on the first backdrop:

Tip: You can also make sprites show and hide when green flag clicked.
There are two ways to position your sprites into layers.
You can drag a sprite on the Stage to move it to the front layer:
Alternatively, you can use a go to front layer or go to back layer block to position a sprite.
If you want a sprite to always stay at the front or back, use a forever loop to make the sprite move back to the correct layer if you accidentally move it:


Sound:

Select the sprite that you want to have the new sound, then select the Sounds tab. Each sprite starts with a default sound:

Scratch has a library of sounds that you can add to your sprites. Click on the Choose a Sound icon to open the Sound Library:

To play a sound, hold your mouse cursor (or your finger, if you are using a tablet) over the Play icon:

Click on any sound to add it to your sprite. You will be taken straight back to the Sounds tab and you will be able to see the sound that you have just added:

If you switch to the Code tab and look at the Sound blocks menu, you will be able to select the new sound:

Tip: You can also add sounds to the Stage.
Select the sprite that you want to have the new recorded sound, then select the Sounds tab:

Go to the Choose a Sound menu and select the Record option:

When you are ready, click the Record button to start recording your sound:

Click the Stop recording button to stop recording your sound:

Your new recording will be shown. You can Re-record your sound if you are not happy with it.
Drag the orange circles to crop your sound; the part of the sound with a blue background (between the orange circles) will be the part that is kept:

When you are happy with your recording, click the Save button. You will be taken straight back to the Sounds tab and you will be able to see the sound that you have just added:

If you switch to the Code tab and look at the Sound blocks menu, you will be able to select the new sound:

Pico and Giga talk with the speech extension: See inside
Click on Add Extension:

Choose Text to Speech:

You will get a new Text to Speech blocks menu:

You can use the blocks in the Text to Speech
You can make a sprite talk out loud when clicked:

You can even give your sprite a kitten voice!

Paint editor — backdrops and costumes
Go to the Choose a Backdrop menu and click on Paint:

You will be taken to the Paint editor, where the new backdrop will be highlighted in the list. If you have other backdrops in your project, you will also see them in the list.

To set the main colour of the backdrop, click on the Rectangle tool, then use the Fill colour chooser to select a colour, then drag the shape over the full backdrop canvas:


If you want to add more details to your backdrop, you can use the Rectangle tool, Circle tool, or Brush tool, or a combination of all three!

When you have finished, make sure that you give your new backdrop a name that makes sense:

Your new backdrop will be shown on the Stage and will be available to use in Looks blocks.

You can create backdrops and costumes for sprites in the Paint editor, using just shapes.
Go to the Choose a Sprite or Choose a Backdrop menu and choose the Paint option:

Select which tool(s) to use to make the shape(s) that you want:
- Circle: Click on the Circle tool to draw a circle. Press and hold the Shift key on your keyboard to draw a perfect circle.

- Rectangle: Click on the Rectangle tool to draw a rectangle. Press and hold the Shift key to draw a square.

- Triangle: Use the Rectangle tool to draw a rectangle or a square. Click on the Reshape tool and select the corner that you want to remove. Click on the Delete tool to turn your shape into a triangle.


You can use the Fill tool to change the colour of a shape:


You may need to use the Forward and Backward tools to move your shapes forward or backward so that they are positioned correctly within your image:

You can select all the shapes and Group them together so that you can adjust them or move them as one shape:


Here is an example of a sprite created with the Circle and Rectangle tools:
Pig: See inside
Remember to name the costumes and backdrops that you create in the Paint editor.
Click on the Fill colour chooser and select the colour that you want for your text:

Select the Text tool:

Click on the Paint editor and start typing.
Click on the Font drop-down menu and select the font that you want:

If you want to resize your text, click on the Select (Arrow) tool and select the text, then drag the corner handles to resize the text:
If you want to change the Fill colour of your text, use the Fill colour chooser to select a colour, then select the Fill (Bucket) tool and hold your mouse cursor over the text (or if you are using a tablet, tap the text). The text will automatically change colour. Click on the text to make the change:

If you want each word in a message to be a different colour, size, and font, follow the process above for each word in your message.
Position your text and/or group of words with the crosshair in the centre of the Paint editor:

To layer your words, use the Forward and Backward tools:

Click on the Costumes tab for your sprite.
Tip: Duplicate the costume that you want to edit — so that you can still use the original costume if you need to. To do this, right-click (or on a tablet, tap and hold) on the costume and choose duplicate. You will now have a copy of the costume:


To remove any part of the costume that you do not need any more, click on the part to select it, then click on Delete:

The duplicated costume with parts removed should look something like this:

Tip: If you make a mistake in the Paint editor, you can click on Undo:
Go to the costume with the part that you want to add and click on the part that you need, then click on Copy:

If you want to add a part from a costume that is not already shown in the Costumes tab, you need to add the costume to your sprite first. Click on the Choose a Costume icon, then find the costume that you want and click on it to add it to your sprite:

When you have copied the part that you need, go back to the duplicated costume and click on Paste. The duplicated costume should now look something like this:

Now, switch to the Code tab. You will be able to use the new costume in your code blocks:

Click on the Costumes tab and then on Choose a Costume to add any costume to the sprite from the Costume Library:

You will need to position and resize the added costume in the Paint editor, to match the sprite’s other costumes.
Tip: If you position a sprite on the Stage and then change its costume, the sprite might appear to ‘jump’ or change size. You will need to position and resize the costumes in the Paint editor so that they all appear in the right position on the Stage.
Test: Show someone else your project and get their feedback. Do you want to make any changes to your game?
Debug: You might find some bugs in your project that you need to fix. Here are some common bugs.
One common mistake is to confuse the change and set blocks.
setchangeadds a number to a variable. If youchange bya positive number, the variable value gets bigger. If youchange by
Another common problem is typing the name of a variable instead of dragging the variable from the Variables blocks menu. Variables should be orange:

Make sure you have placed code blocks that need to keep running inside a forever block. It’s really common to forget to do this!
Are you sure you have used the > (greater than) and < (less than) operators the right way around?

Tip: The number that must be bigger goes on the wider (bigger) side of the operator symbol.
Make sure you have a matching when I receive block that does something when you broadcast a message. Check that the message names match.
You might find a bug not listed here. Can you figure out how to fix it?
If you get stuck, try reading your code out loud or explaining the problem to a friend. You might spot the problem.
We love hearing about your bugs and how you fixed them. Use the feedback button at the bottom of this page if you found a different bug in your project.